Can You Actually Tile Over Existing Tile
Tiling over tile has gotten complicated with all the conflicting advice flying around. Ask three contractors and you’ll get three different answers — usually delivered with complete confidence. I managed a tile installation crew in suburban Ohio for two years, and I learned everything there is to know about when this works and when it absolutely doesn’t. Today, I’ll share it all with you.
Short answer: yes, sometimes. But here’s what nobody actually tells you — the method matters far less than whether your existing tile deserves another layer on top of it.
We’d show up to jobs where homeowners had already made their decision. Half the time we’d talk them out of it. The other half we’d proceed, everything looked great for maybe six months, then the callback would come. Lippage. Cracks. Tiles popping off in clusters. It’s miserable work to undo — trust me on that one.
When tiling over tile actually works, it’s genuinely efficient. Two to three days of labor saved compared to full demo. No dust getting into everything you own. No old mortar disposal fees at $45–$80 a haul. But you’re only saving yourself if the base tile passes three hard tests first.
Ask yourself these questions before you touch anything:
- Is every single tile fully bonded to the substrate below?
- Is the subfloor rigid enough to carry another layer without flex?
- Will adding 3/8 to 1/2 inch of height cause problems with your doors, transitions, or fixtures?
One “no” anywhere on that list and you stop here. Skip straight to the removal section. This isn’t excessive caution. It’s avoiding a disaster eight months from now.
Signs Your Existing Tile Is Not a Good Base
Probably should have opened with this section, honestly — because getting this wrong is where most DIY tile jobs go sideways before a single new tile is set.
Start with the tap test. Walk every square foot with a coin or a small hammer and just listen. Solid tile sounds dense. Clear. A hollow tile sounds like you’re tapping on plastic. You’ll hear the difference immediately — there’s no mistaking it.
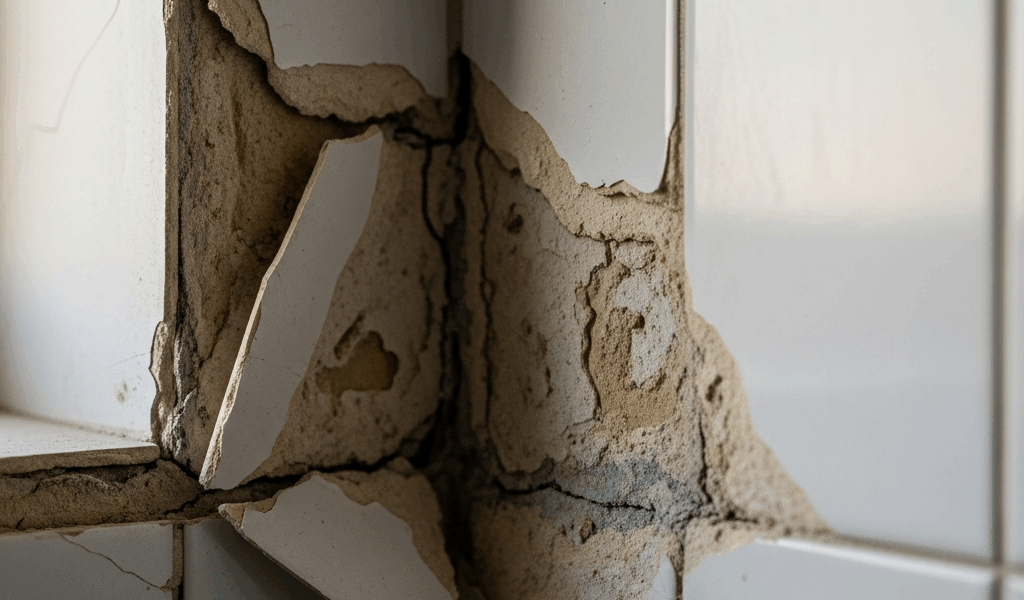
One hollow tile is enough to disqualify the whole floor. Sound travels through thinset. The new layer will crack above that void, almost always in a star pattern radiating out from the weak point. Within twelve months that crack spreads. Within eighteen, neighboring tiles start going too.
Cracked tiles in the existing layer are another hard no. A crack is a structural failure point — full stop. Troweling thinset over it doesn’t fix anything. It bridges the crack with a new layer, and movement still happens below. I’ve personally seen cracks reappear through fresh tile within weeks of installation. Don’t make my mistake of thinking new thinset will hold it together.
Check the grout next. Press a screwdriver into the grout joints with some real pressure. If grout crumbles or comes away in chunks, it’s failed. Failed grout means water has already gotten in. Moisture trapped between layers telegraphs upward through new thinset, creating hollow spots in fresh installation. You can’t successfully tile over a wet secret hiding underneath.
Tiles that shift under hard pressure — not a tiny amount of give, but actual visible movement — tell you the substrate is flexing. A floor that moves takes your new tile along for the ride. You’ll see lippage. You’ll see tiles working loose at the edges. The subfloor is the real problem there, and tiling over anything won’t fix it.
Bathrooms and kitchens deserve extra scrutiny. Shower floors and areas around toilet bases are moisture magnets. Visible stains, soft grout, any history of water problems whatsoever — don’t proceed. The gap between tile layers becomes a moisture trap that quietly destroys your work from the inside.
Add everything up. More than 20 percent hollow coverage, or crumbling grout across a wide area, and removal is already cheaper than paying someone to redo a failed installation later.
The Height Problem Most DIYers Ignore
Tiling over tile adds real, measurable thickness. Standard thinset runs about 1/8 inch. A new tile at 1/4 inch thick plus grout joints at roughly 1/8 inch per side equals approximately 1/2 inch of total height gain. Some jobs creep toward 5/8 inch depending on tile thickness.
This matters. Not theoretically. In your actual home. Right now.
Doors first. A standard interior door needs at least 1/8 inch of clearance above finished floor. Add 1/2 inch of new tile and that clearance is gone — you’ll scrape the door bottom on every swing. A trim carpenter can undercut doors for somewhere around $50–$80 each. But glass doors can’t be undercut. Neither can bifold doors.
Toilet flanges sit at a fixed height. The flange should land 1/4 inch above finished floor level — at least if you want the wax ring to seal properly. Add 1/2 inch of tile and suddenly the flange is recessed below the surface. Water pools. Wax rings fail faster. The toilet eventually rocks, and now you’ve got a slow leak inside your wall. A replacement flange is around $12 at any hardware store. The wall damage it causes costs thousands.
Transitions to adjacent flooring get awkward or impossible. Tile the kitchen while the living room stays hardwood and you need a transition strip — one designed for a specific height difference. Add 1/2 inch of tile and that strip sits wrong. Trip hazard. Looks terrible. Neither problem is easy to fix after the fact.
Dishwashers in tight spaces are a sneaky one. I once watched a homeowner finish tiling their kitchen floor only to realize the dishwasher — already ordered, arriving in three days — no longer fit under the raised counter clearance. That was an expensive afternoon of phone calls. Measure twice before you start. Write the numbers down.
How to Tile Over Tile When the Conditions Are Right
So, without further ado, let’s dive in — assuming your existing tile passed everything above.
Clean the surface thoroughly first. Use an actual alkaline degreaser, not just water. Grease residue from kitchen tile or soap buildup in showers prevents bond in ways you won’t notice until three months later when tiles start lifting. Rinse completely and let it dry — fully dry, not “looks dry.”
Scuff the glazed surface using 120-grit sandpaper or a scarifying tool. You’re not trying to remove the tile. You’re dulling the shine and creating mechanical grip for thinset. This step is non-negotiable on glazed tile. I’m apparently sensitive to skipping steps, and “scuff the tile” is the one I see skipped most — don’t make my mistake.
Polymer-modified thinset might be the best option here, as tiling over tile requires strong adhesion to glazed surfaces. That is because standard thinset doesn’t grip glazed ceramic reliably — modified thinset costs maybe $3–$5 more per bag. That’s cheap insurance. Buy the right stuff.
While you won’t need a full contractor’s tool kit, you will need a handful of specific items: the right notched trowel for your tile size, a margin trowel for back-buttering, and a rubber mallet. Larger tiles — anything 12 inches or bigger — need 1/2-inch square notches. Smaller tiles work fine with 1/4-inch notches. Back-butter every tile larger than 8 inches by applying thinset directly to the tile back before setting. This fills voids and prevents hollow spots in the new layer.
Offset new grout joints away from the old ones below. Run new joints perpendicular to old joints wherever the layout allows. That breaks up stress lines and distributes movement across the installation rather than concentrating it.
Keep grout joints consistent — 1/8 inch is standard for wall tile, up to 1/4 inch for floor tile depending on the look you’re going for. Wider joints are more forgiving of slight lippage but only look intentional on rustic or handmade-style installations.
When You Should Just Pull the Old Tile Up
Sometimes the fastest path forward is the longest one. That’s what makes honest assessment endearing to us — it saves money you’d otherwise spend fixing the wrong decision.
Two or more existing tile layers already down? Stop. Multiple layers mean multiple stacked failure points. Adding another layer on top of that is borrowing serious trouble. Removal takes time. It’s still the right call.
Subfloor flexes noticeably when you walk across it? Sagging in the joist bay below? The floor needs structural repair before any tile goes down. First, you should fix the subfloor — at least if you want tile that actually stays put. Tile doesn’t solve flex. It fails because of it.
Hollow coverage over 20 percent of the surface means removal is already the cheaper option. You’re looking at 50–60 percent of the new installation potentially failing within a year. Pay for removal now or pay more for a complete redo later.
Bathroom remodels already gutted to studs are the easiest call. Fixtures are already out. New plumbing is already running. Tile removal is just one line item in a project already underway. There’s no real savings argument for tiling over tile when everything around it is already torn apart.
But what is the right call, exactly? In essence, it’s the one that accounts for what’s actually under your feet. But it’s much more than that — it’s the decision you make before you’ve already bought the tile and scheduled the weekend. Make it early. This whole article exists because the wrong call is easy to make and genuinely expensive to live with.


Leave a Reply