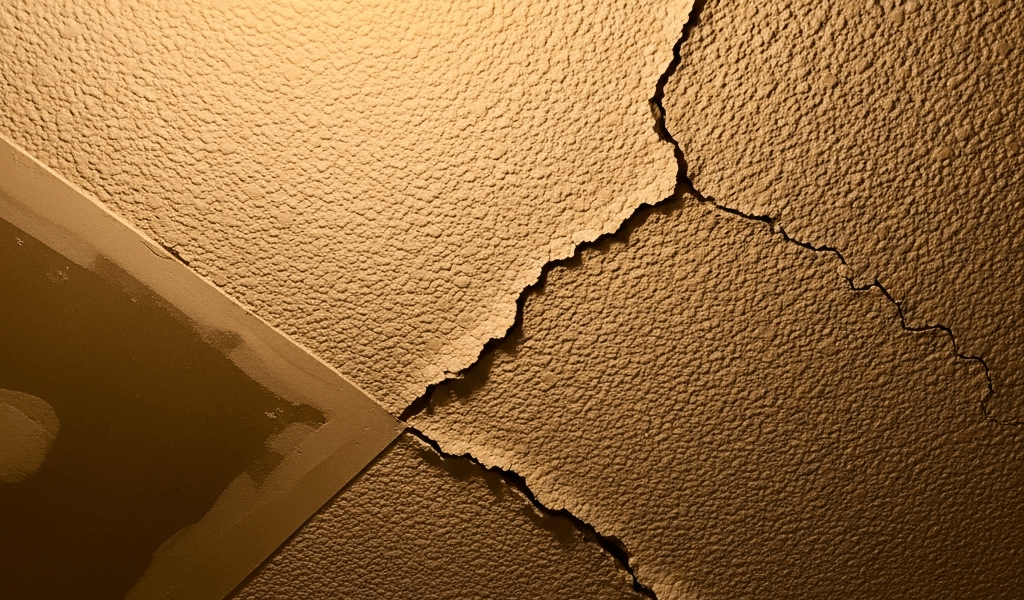
Why Popcorn Ceilings Are a Pain to Remove
Popcorn ceiling removal has evolved with all the conflicting advice flying around. As someone who bought a 1975 colonial and spent three months dealing with the aftermath, I sat down and learned this particular home improvement nightmare. Today, I will share it all with you.
But what is popcorn ceiling texture, exactly? In essence, it’s a spray-applied acoustic coating — usually styrene, vermiculite, or perlite suspended in a binder — that gets shot onto wet drywall and hardens into that bumpy, cottage-cheese surface you remember from every house built between 1950 and 1985. But it’s much more than that. This is the piece to know up front. If your home was built before 1978, that texture may contain asbestos. That single fact changes every number in this article.
This article includes affiliate links. We may earn a commission at no extra cost to you.
The real mess starts the moment you try to take it down. Texture clings hard to the drywall substrate underneath. Water softens it — unevenly — and if you scrape too aggressively, you gouge the drywall. Leave any patches behind and your repair work shows. Worse, if someone painted over that ceiling in the last couple decades, water absorption becomes completely inconsistent. Paint seals the material. What should be a four-hour job turns into a two-day ordeal.
Then there’s the dust. Popcorn removal produces fine particles that settle into everything. Two weeks after I finished my living room, I was still finding white grit on bedroom surfaces on the other side of the house. If asbestos is involved, that’s not internet alarmism — that’s an actual documented health hazard with regulatory frameworks built around it. That’s what makes proper testing so endearing to us cost-conscious homeowners who’d otherwise just grab a scraper and start swinging.
Average Cost to Remove Popcorn Ceilings
So, without further ado, let’s dive in — with real numbers instead of the vague ranges most sites throw at you.
- DIY removal supplies only: $50 to $200 per room. You’re buying a spray bottle, a 3-inch scraper, plastic sheeting, drop cloths, drywall joint compound, sandpaper, primer, and paint. One room here means roughly 150 to 200 square feet — a standard bedroom or modest living space.
- Professional removal (no asbestos): $1 to $2 per square foot, with regional variation baked in. A 200-square-foot bedroom runs $200 to $400. A 600-square-foot vaulted master suite? Budget $800 to $1,400. In San Francisco, New York, or Boston, push those numbers toward $2.50 to $3 per square foot.
- Asbestos testing: $25 to $75 per sample. Most contractors want one sample per room or per distinct texture type. Results take 5 to 10 business days — plan accordingly.
- Asbestos abatement removal: $3 to $7 per square foot, sometimes higher. Licensed abatement crews run full containment, negative air pressure systems, and regulated disposal. A 200-square-foot room with confirmed asbestos: $600 to $1,400, sometimes more depending on your metro area.
- Finishing work — skim coat, primer, paint: Add $0.50 to $1.50 per square foot on top of removal costs. Sometimes included in contractor quotes. Often not.
Real example: my upstairs hallway measured 180 square feet. Test came back positive for asbestos. Total removal and finishing through a licensed abatement contractor — $1,240. DIY stopped being a conversation the moment that result arrived.
What Drives the Price Up or Down
Ceiling height is the factor homeowners underestimate most. An 8-foot ceiling is baseline pricing. Nine-foot ceilings require extended ladder work and extra setup time — add $200 to $400 to any quote. Vaulted ceilings over 10 feet mean scaffolding. Budget an additional 50 percent on the total job.
Texture thickness varies wildly from house to house. Some applications are thin — maybe 1/8 inch, single coat. Others are thick, layered, sometimes mixed with insulation or soundproofing material. Thick texture takes longer to remove and generates significantly more debris. The contractor who quotes you sight-unseen is guessing.
Painted-over texture is its own beast — at least if you’re hoping for an easy job. Water won’t penetrate a painted surface. That forces manual scrape-by-scrape removal, which easily triples labor time. Contractors typically tack on 25 to 50 percent for painted ceilings. I’m apparently unlucky with kitchens, because mine had been spray-painted white sometime around 1998, and removal took twice the expected time. Spare yourself the wrong turn I took — ask the previous owners or check old photos before you get quotes.
Room size compounds everything else. A single small bedroom is inefficient work for any crew — most contractors set minimum charges between $300 and $500 regardless of square footage. But scale up to four bedrooms, hallways, and a living room — 1,800-plus square feet — and per-square-foot costs drop 20 to 30 percent. One containment setup, one extended job, one crew. The math works in your favor.
Local labor rates shift the entire equation. Rural areas run $0.75 to $1.25 per square foot. Suburban markets land between $1 and $1.75. Major metros push $2 to $3.50. This isn’t negotiable variation — it reflects what licensed crews cost to operate in those markets.
DIY vs Hiring a Pro — How to Decide
While you won’t need a construction crew, you will need a handful of specific tools and honest self-assessment. DIY makes sense if your home was built after 1980, the texture is unpainted, the room is under 250 square feet, and you’re genuinely fine with four to six hours of physical ceiling work followed by a full day of repairs and sanding.
Your supply list: a pump spray bottle, drop cloths, plastic sheeting to protect walls and furniture, a Warner 3″ ProGrip Stiff Scraper, a wide putty knife, drywall joint compound, and sandpaper in both 120 and 220 grit. That’s genuinely everything.
The process itself — wet the ceiling in 3-foot sections, let it soak 10 to 15 minutes, scrape at an angle, repeat — is straightforward until it isn’t. Rushed scraping means gouged drywall. Gouged drywall means compound work. Compound work reveals every imperfection you missed during removal. Budget the second day before you start the first.
Hire a professional if: your home predates 1978 and testing hasn’t happened yet, the texture is painted, ceilings run over 9 feet, you have more than two rooms, or you value having a functional weekend. That’s not judgment — that’s math. Contractors finish in hours what takes homeowners days, they handle debris containment properly, and the good ones include finishing in the quoted price.
Frustrated by an unexplained water stain beneath my hallway texture, my contractor stopped mid-job and called me in to look — using just a flashlight and a moisture meter. Turned out there was active damage from an old roof leak. Finding that during removal, rather than two years later during a sale inspection, saved a significant amount. Early discovery changes outcomes. That’s what makes experienced contractors worth the premium to us homeowners dealing with older houses.
What Comes After Removal and Hidden Costs to Know
Stripped drywall is rarely pristine. Skim coating — a thin layer of joint compound applied over the bare ceiling, sanded smooth, primed with something like Zinsser Bulls Eye 1-2-3 Primer, and painted — runs $0.50 to $1.50 per square foot. Sometimes that’s folded into the removal quote. Sometimes it’s a separate line item. Ask before you sign anything.
Some homeowners skip removal entirely. Suspended drop ceiling panels or new drywall installed directly over existing texture both sidestep the whole process — but drop your ceiling height by 4 to 6 inches. Panels run $2 to $4 per square foot installed. New drywall overlay runs $1.50 to $2.50 per square foot. Valid options, depending on what you’re working with.
First, you should get an asbestos test — at least if your home was built before 1978. It’s $50 to $75 per sample. That’s the cheapest insurance in home improvement. Then collect three quotes from licensed local contractors. Lowest price might be the worst option, as popcorn removal requires proper licensing for abatement work. That is because asbestos disposal is federally regulated, and an unlicensed contractor cutting corners creates liability that lands on you as the homeowner.
Total budget for a standard 200-square-foot room: $300 to $600 doing it yourself with no asbestos present, $600 to $1,200 with a professional and clean results, $1,200 to $2,200 when asbestos abatement is part of the equation. Those numbers held almost exactly for my house. They’ll likely hold for yours.

Leave a Reply