Figuring Out Where the Water Comes From Matters More Than the Water Itself
Wet basement diagnosis has changed quite a bit thanks to the contractor opinions and waterproofing ads flying around. As someone who spent three months chasing the wrong fix in my own 1987 colonial, I spent months getting comfortable with where basement water actually originates. Today, I will share it all with you.
A wet basement after heavy rain is a symptom. Not a diagnosis. Water stains kept showing up every time we got more than two inches — I called three contractors, heard three wildly different explanations, and nearly spent money I didn’t need to spend. One said interior drain tile. One said gutters. One wanted to talk about full foundation replacement.
But what is a wet basement, really? In essence, it’s water finding the path of least resistance into your home. But it’s much more than that. Water enters through two distinct pathways, and fixing the wrong one burns thousands of dollars. Understand which category you’re dealing with and everything about your next step changes.
Water either pushes through walls and cracks under hydrostatic pressure from saturated soil — or it seeps quietly through cracks, joints, and porous concrete without much force behind it at all. Stain patterns, location, and what else looks wet in your basement all point toward which one you have. Misidentify it and you’ll install a $7,000 interior sump system when $200 worth of re-grading and a weekend of work would have solved it entirely.
Check Outside First Before You Ever Look Inside
Go outside. Bring a notepad. This step alone catches the problem in at least 70 percent of residential wet basement cases — at least if you do it right after a heavy rain when the evidence is fresh.
Start with grading immediately around your foundation. Walk from the house outward. Does the ground slope away from you or toward you? Proper grading drops at least six inches in elevation over the first ten feet away from the foundation wall. Most homes fail this basic test — soil settles over decades, landscaping buries the original slope, and mulch piles up against siding until the whole area tilts the wrong direction. Result: water pools directly against your basement wall instead of running away from it.
Stand at your gutters next. Where does water actually discharge? Downspouts should terminate at least six to eight feet from the foundation — ideally ten feet if you’re dealing with clay soil. I’ve personally watched homeowners pour $10,000 into basement waterproofing when gutters were dumping water three feet from the house. The water never even reaches the foundation wall properly. It just soaks the adjacent soil until that soil saturates and starts pushing.
Check window wells if you have them. These sunken areas are traps, honestly. Water collects, pressure builds against the window frame and wall, seepage starts. Look for debris, standing water after rain, cracked covers. A well with standing water tells you drainage isn’t working — either the drain is clogged or the area was never graded to shed water in the first place.
Finally, dig into the soil at your footing. Literally. Stick a screwdriver into the ground next to the foundation wall. How wet is it? Saturated clay against your basement wall is essentially a water dam pressing against concrete 24 hours a day. That pressure pushes water through cracks you can’t even see with the naked eye.
Reading the Water Stains — They’re Actually Telling You Something
Your basement walls are telling you a story. You just need to know how to read it.
Stains high on the wall — especially near basement windows — usually point to surface water intrusion. Water pooled around that specific area and found a way through. Check exterior grading and the window well first. This fix is often simple and genuinely cheap. That’s what makes exterior diagnosis so endearing to us DIYers — the answers are usually right there.
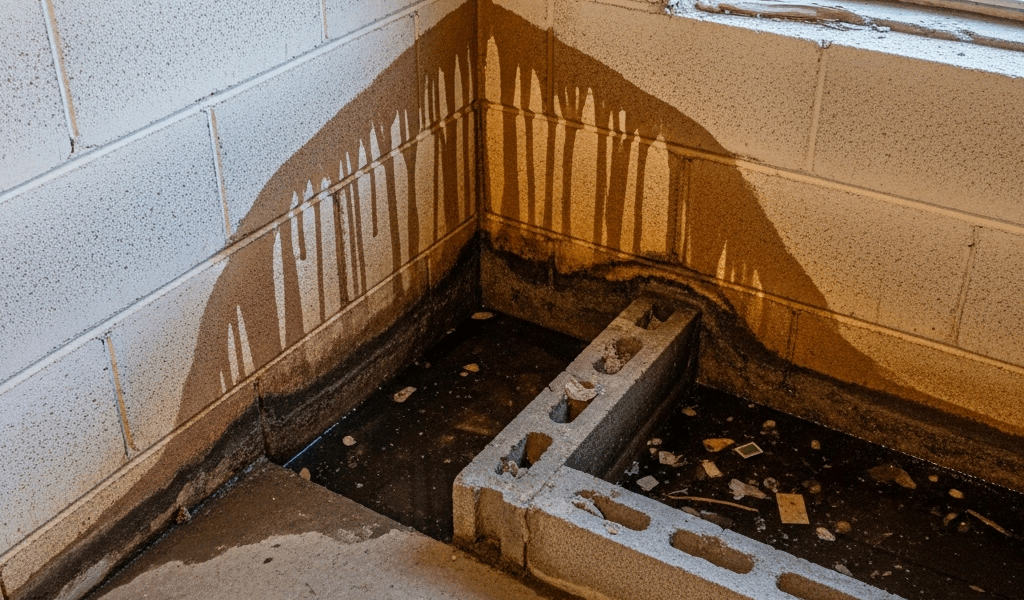
Stains at the cove joint — where the basement floor meets the wall — indicate something different entirely. Hydrostatic pressure. Water is pushing up from the soil below or through the concrete floor itself. The cove joint is structurally the weakest point, so water finds it and weeps through. Interior drain tile systems address this, but so does fixing exterior drainage and grading before you spend a dime on anything else.
White mineral deposits clustered in one spot, especially inside cracks, mean that crack has been weeping repeatedly over a long period. Water carries minerals through, deposits them as it evaporates, leaves a white or tan chalky residue. That residue is diagnostic — there’s a leaking crack path right there.
If only one wall is wet, trace why. That wall probably faces downhill. Rain runs that direction. Check grading, gutters, and window wells on that specific side before doing anything else.
Common Causes Ranked by How Often They Actually Show Up
1. Negative grading — most common by a wide margin. Ground slopes toward the house instead of away. You see water stains on multiple walls, often after moderate rain — not even the heavy stuff. Fix: excavate soil away from the foundation to restore proper slope, minimum six inches of drop per ten feet. DIY-friendly and permanent. Cost: roughly $500 to $2,000 depending on how much linear footage you’re dealing with.
2. Failed gutter extensions or missing gutters entirely. Downspouts discharge too close to the foundation — or don’t exist. Water pools directly against the wall. Staining concentrates on one or two walls nearest those discharge points. Fix: extend downspouts or install them. Absolutely DIY-able. Cost: $100 to $600 for materials, a bit more if you hire it out.
3. Cracks in poured concrete walls. Visible cracks — usually vertical or diagonal — with water weeping through. Concrete shrinks as it cures, settles unevenly, and soil pressure works those cracks wider over time. Fix: polyurethane caulk for minor hairline cracks, professional epoxy or polyurethane injection for serious ones. DIY works for hairline stuff. Cost ranges from $20 to $5,000 depending on severity. Wide range, I know — but crack severity varies wildly.
4. Deteriorated block mortar joints. Concrete block basement, mortar crumbling or missing between blocks. Water flows straight through empty joints. More common in homes built before 1970. Fix: repoint mortar joints from outside if accessible, or seal from inside. This one’s professional tuck-pointing territory — not DIY. Cost: $1,500 to $4,000.
5. Failed interior drain tile or no drainage at all. Water pools on the floor, comes up through the floor itself, or you have standing water at the footing. Original drain system failed or was never installed. Fix: interior or exterior drain tile replacement. Requires professional installation. Cost: $3,000 to $15,000. This is the expensive end — which is exactly why you rule out everything above first.
When You Actually Need to Call a Waterproofing Contractor
Quick callout up front. The waterproofing industry has a reputation for high-pressure sales tactics — at least among the companies that profit from recommending $12,000 interior systems when $400 of regrading would have done it.
You genuinely need a contractor when: cracks run across an entire wall, the floor actively weeps water, water is coming up from beneath the floor under visible pressure, or mortar joints are significantly deteriorated and the wall shows any structural movement at all. Don’t do what I did of waiting too long on that last one.
You do not need a contractor yet if the wet basement appears only after heavy rain, stains concentrate on one wall, or you can see water pooling outside before it ever enters the basement. Those are exterior drainage problems. Treat them like exterior drainage problems.
The honest hierarchy here: fix exterior grading and gutters first. Total cost under $1,000 in most cases, solves 60 to 70 percent of residential wet basement situations. If water still appears after you’ve done that work — waited through at least two or three heavy rain events — then call a foundation specialist. Get two estimates minimum. Interior drain tile systems are genuinely necessary in some situations. But only after exterior work has been attempted and failed, not before.
Interior sump systems and drain tile are not solutions for negative grading. They’re band-aids — effective band-aids that work, sure, but you’re spending thousands to pump water that never should have accumulated against your foundation in the first place. I’m apparently someone who learns this lesson the expensive way, and honestly, that approach never works out the way you hope. Fix the outside first. Always.


Leave a Reply