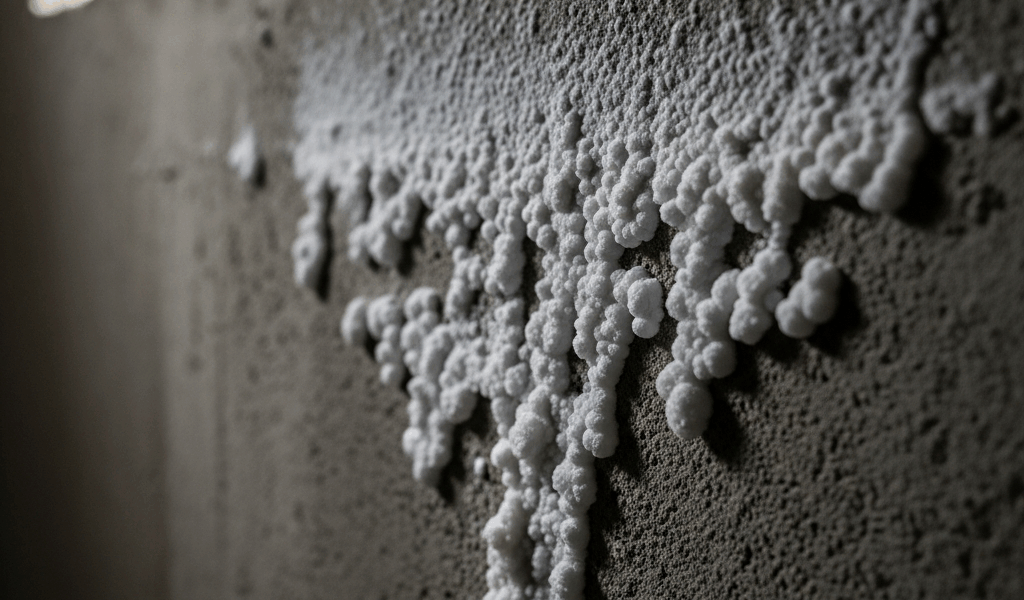
What That White Chalky Stuff Actually Is
Efflorescence on basement walls has started getting harder to follow with all the conflicting advice flying around. So let me cut straight to it. That white, powdery coating on your wall? Mineral salts. Calcium, sodium, potassium — the specific kind depends on what’s in your masonry. Water moves through your concrete or brick, hits the surface, evaporates, and leaves those minerals behind like a receipt proving moisture was there.
But what is efflorescence, really? In essence, it’s a mineral deposit. But it’s much more than that — it’s your wall telling you something about water movement you probably weren’t aware of. It shows up most often in basements because that’s where water naturally migrates. The salts aren’t growing. They’re not alive. And here’s the part people get wrong constantly: efflorescence is not mold, not paint failure, not a sign your foundation was poured badly. It’s evidence. Full stop.
You’ll find it on poured concrete, concrete block, brick — basically any masonry surface. The texture varies wildly. Sometimes it’s a thin film, almost invisible under your hand. Other times it builds up thick and crusty, like someone went at the wall with a piece of chalk. The pattern tends to follow water paths too. Heavier at the base. Concentrated near a crack. That distribution tells you something if you pay attention to it.
Here’s what I learned the hard way after dealing with this in my own 1987 split-level: most people panic and assume this means catastrophic foundation failure. It almost never does. Millions of basements have efflorescence. Most are completely fine. Your actual job right now is figuring out which category yours falls into — and that part matters enormously.
Why It Showed Up on Your Basement Wall
Three causes put that white stuff there. Knowing which one applies to your situation changes everything about what you do next. So, without further ado, let’s dive in.
Hydrostatic pressure —
Water in the soil outside your foundation is physically pushing inward. Happens when the water table runs high or when soil holds water like a saturated sponge after heavy rain. That pressure forces water through tiny capillaries in the masonry. The water carries dissolved minerals. When it reaches the inside surface and evaporates, the minerals stay behind. Most common scenario in below-grade basements — especially in clay-heavy soil.
Grading and drainage failures —
Soil sloping toward your foundation instead of away from it. Gutters dumping water near the footing. Downspouts ending 18 inches from the house instead of the 4-to-6-foot minimum. These are the easiest problems to spot and, honestly, often the cheapest to fix. Walk your perimeter during or right after a rain. Water pooling near the wall? Flowing toward it rather than away? There’s your answer — no fancy diagnostic equipment needed.
Condensation and humidity —
This one gets overlooked constantly, and I’m apparently in the minority of people who check for it first. Your basement runs cooler than the surrounding soil and air. Moisture condenses on those walls exactly like it does on a cold bathroom mirror in July. Over time, that moisture dissolves minerals right out of the masonry and deposits them on the surface. You’ll notice this year-round, but it spikes in summer when humidity climbs past 60 percent.
The diagnostic clues matter enormously here. Did the efflorescence appear suddenly after a heavy rain or a particularly wet spring? Points to hydrostatic pressure or drainage issues. Has it been sitting there for years, steady and slow, worse when it’s humid outside? Condensation is likely your culprit. Is it in one concentrated spot, or spreading across an entire wall section?
Spreading deposits usually signal active water intrusion that’s worsening. Stable deposits that haven’t moved in six months? That’s genuinely useful information too — it suggests the water event that caused it may have already passed.
Cosmetic Problem or Something Worse
Worth flagging before going further, because it determines whether you’re about to spend $200 or $20,000. These are not equivalent situations.
Ask yourself these questions in this exact order:
- Are the deposits light, powdery, and confined to the surface only?
- Is there no active seepage, no dampness sitting underneath the efflorescence?
- Are the walls straight and crack-free?
- Has the deposit stayed roughly the same size for the last 6 to 12 months?
Four yes answers: almost certainly cosmetic. The minerals are telling you water came through once or twice — not that it’s coming through right now. Treat it yourself, monitor it quarterly, move on. You’re not in crisis.
Now the red flags. Any single one of these means you get a professional assessment before touching anything:
- Active seepage or wet spots directly behind or near the efflorescence
- Deposits returning within two to three weeks after you’ve cleaned them off
- Spalling — actual chunks of concrete or brick breaking away from the surface
- Any wall bowing or visibly curved surfaces, even slightly
- New cracks appearing or existing cracks widening noticeably
- The efflorescence spreading measurably from one month to the next
Those aren’t cosmetic. A foundation engineer or reputable waterproofing contractor needs eyes on this in person — not a YouTube video, not a neighbor’s opinion.
The mistake I see homeowners make over and over: they clean the efflorescence off, see the wall looks normal again, and assume they solved something. Avoid the path I took. Cleaning is temporary maintenance. It does nothing about the water that created it in the first place.
How to Remove It and What Not to Do
If you’re firmly in the cosmetic category, here’s the removal sequence that actually works.
Start dry. Brush the surface with a stiff-bristled dry brush — brass or nylon bristles, not steel wire, which can leave metal deposits that rust later. You’re just knocking off loose powder. This alone handles maybe 60 percent of the deposit and costs you nothing but 10 minutes.
Next step: mix one part white vinegar to three parts water, or use a dedicated masonry cleaner like Zep Driveway & Concrete Cleaner — runs about $12 at Home Depot for a 128-ounce jug. Spray or brush it onto the affected area, let it sit 10 to 15 minutes, scrub gently with a soft brush, and rinse thoroughly. Let it dry completely before you do anything else — and I mean completely, like 24 hours in decent ventilation.
Once dry, inspect. You might see some efflorescence returning within a few days as residual moisture still in the wall finishes evaporating. That’s normal. Clean it again. It stabilizes eventually.
While you won’t need industrial equipment, you will need a handful of basic supplies — the brush, the cleaner, a spray bottle, safety glasses, and rubber gloves. That’s genuinely it for cosmetic cases.
What absolutely not to do: do not seal over active moisture with waterproof paint or an epoxy coating. This is the trap that costs people real money. You seal the surface, water gets trapped inside the wall, pressure builds behind that coating, and suddenly you’ve created spalling and structural damage that wasn’t there before. If active seepage exists anywhere on that wall, sealing makes things measurably worse.
Pressure washing — also no. It forces water deeper into the masonry and destroys the surface texture. Indoor basements aren’t the place for high-pressure anything.
Stopping It From Coming Back
Prevention costs substantially less than crisis response. That’s what makes these fixes so endearing to us homeowners who’ve already written the expensive check once.
Exterior grading and drainage —
Regrade soil so it drops at least six inches over the first 10 feet away from the foundation. Extend downspouts 4 to 6 feet out minimum — or install underground extensions that route water well away from the footing. Clean gutters twice yearly, spring and fall. These fixes typically run $500 to $2,500 depending on your property. They prevent most water problems from starting.
Interior humidity control —
A dehumidifier rated for your actual basement size — something like a 50-pint unit for a standard 1,000 square foot space, the Frigidaire FFAP5033W1 runs about $280 at most appliance retailers — costs $300 to $600 upfront and roughly $15 monthly in electricity. It reduces condensation dramatically. I’m apparently someone with a particularly humid basement, and running one continuously works for me while seasonal use never quite solved the problem. First, you should size it properly — at least if you want results rather than a false sense of security.
Chronic hydrostatic pressure —
If your basement stays damp despite fixing all the drainage, you’re fighting water table elevation. An interior drainage system — French drain along the perimeter feeding a sump pump — costs $3,000 to $8,000 but captures water before it reaches your walls. Exterior waterproofing membrane applied directly to the foundation from outside runs $5,000 to $15,000 but stops water from entering entirely.
Interior drainage might be the best option, as active hydrostatic pressure requires ongoing water management rather than just exclusion. That is because high water tables don’t disappear — they need somewhere to go. Exterior membrane works longer-term but requires excavating around the entire foundation. Your specific situation determines which approach makes financial sense.
The white powder on your basement wall isn’t a mystery anymore. It’s information — specific, readable, actionable information. Use it correctly and you’ll know whether this is something you address this weekend with a $12 bottle of cleaner or something that needs a professional on-site before winter hits.


Leave a Reply