Cupping vs Crowning — How to Tell the Difference
Hardwood floor problems have gotten less clear-cut with all the conflicting advice flying around. Warped boards, weird-looking planks, floors that feel uneven underfoot — most homeowners have no idea whether they’re dealing with cupping or crowning. Those are two different problems. They look different, feel different, and need completely different fixes. Today, I’ll share everything I know about telling them apart — and what to actually do about it.
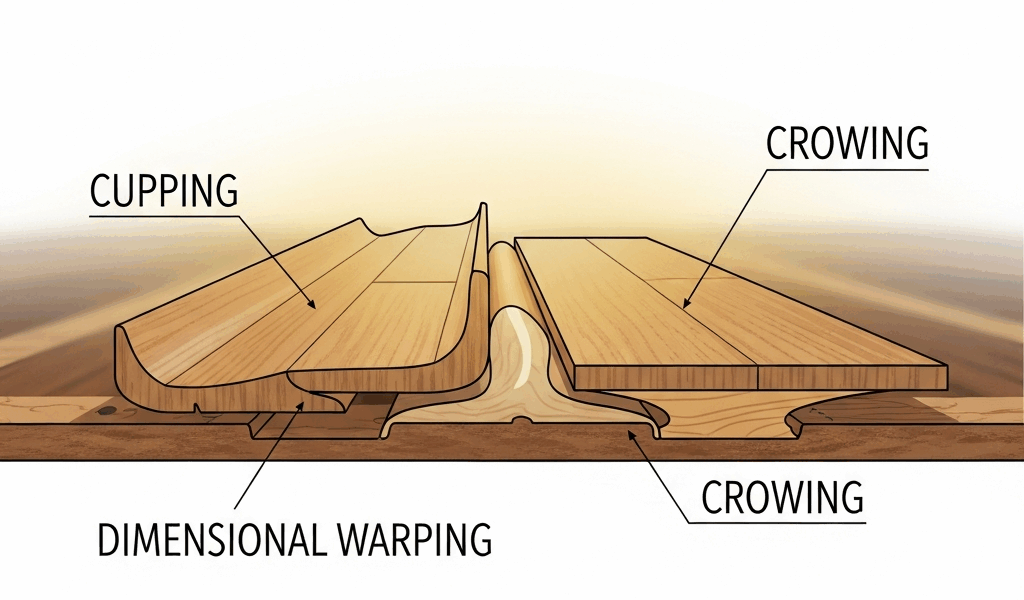
Cupping is when the edges of a board rise higher than the center. Each plank ends up shaped like a shallow canoe. Run your palm flat across the surface and you’ll feel your hand dip into the middle of every board. From across the room, cupped floors catch light weirdly along those raised edges — it’s unmistakable once you’ve seen it. The boards are still connected at the seams. They’re just not flat anymore.
Crowning is the opposite situation entirely. The center of each board humps upward while the edges stay lower. Picture a tiny ridge running lengthwise down every plank. Walk across a crowned floor and it feels like a washboard under your feet. The middle is the high point. From the side, it looks bumpy in a way you genuinely can’t unsee once you know what you’re looking for.
Here’s the fastest diagnostic trick I know — Important part first. Grab a straightedge. A level, a long ruler, even a standard 48-inch yardstick works fine. Lay it across three or four boards. Does it rock on the raised edges? That’s cupping. Does it rock on the center hump? That’s crowning. Saves about twenty minutes of guessing.
Why Both Problems Come Down to Moisture
But what is a cupping or crowning problem, really? In essence, it’s a moisture imbalance inside the wood. But it’s much more than that — it’s a sign something in your home’s environment is actively wrong, and the floor is just the messenger.
Wood absorbs moisture constantly. From the air, from liquid sources, from whatever’s beneath it. When the bottom of a hardwood plank pulls in more moisture than the top, the underside swells more aggressively. The top can’t expand to match, so the edges get yanked upward. That’s cupping. It typically means moisture is rising from below — a damp crawl space, a slow plumbing leak, moisture wicking up through a concrete slab.
Crowning works in reverse. The top surface absorbs moisture — or the bottom dries out faster — and the center swells and lifts instead. Here’s where it gets frustrating: crowning sometimes develops directly from cupping that got sanded too early. Someone sees the raised edges, sands them flat, and thinks the problem is solved. But if moisture is still present underneath, the board rebounds as it dries — and now the center is the high point. That damage locks in permanently. Skip the misstep I made of rushing the fix before the wood is actually dry.
How to Find Where the Moisture Is Coming From
You cannot fix the floor until you find the water source. Non-negotiable. Spend thirty minutes tracking it down before you spend a single dollar on repairs.
- Check your crawl space or basement — Get under the house if you can physically access it. Look for standing water, wet soil, visibly damp joists. Feel the air. Does it smell musty? Crawl spaces account for the majority of cupping cases I’ve personally seen — easily more than half.
- Look for plumbing leaks — Slow drips under the floor stay invisible until the wood shows the damage. Check supply lines, drain pipes, water heater connections. Even a small drip running undetected for three or four weeks will cup hardwood relentlessly.
- Inspect HVAC condensation lines — Air handlers and furnaces generate condensation. A clogged or cracked drain line lets water pool near the floor system. I tracked this exact issue in a 1970s split-level — a PVC condensate line had separated at a coupling joint, dripping quietly for who knows how long.
- Track seasonal patterns — If the problem peaks in July and improves by December, you’re dealing with ambient humidity rather than a specific leak. Crawl spaces and basements naturally accumulate moisture during warm months.
- Review the original installation — Floors installed during high-humidity conditions and then hit immediately with aggressive air conditioning sometimes acclimate to the wrong moisture level from day one. Rare, but it happens.
Invest in a pinned moisture meter — Wagner and Extech both make solid ones in the $25 to $40 range. I’m apparently an Extech person and the Model MO55 works for me while the cheaper no-name versions never gave me consistent readings. Measure the damaged boards, then measure boards that still look fine. Damaged wood typically reads 12% to 16% moisture content. Healthy wood in the same floor reads 6% to 9%. That gap tells you the moisture problem is still active.
What You Can Fix Yourself and What You Cannot
The honest answer depends on two things: where the moisture came from, and how bad the damage actually is.
Mild cupping often self-corrects — once you stop the moisture source and let the wood dry out properly. That process takes weeks, sometimes a few months. Control the indoor humidity, fix the root cause, and wait. I watched cupping that looked genuinely alarming in March disappear almost entirely by early June after a crawl space got sealed with 6-mil poly sheeting and a small dehumidifier ran continuously for eight weeks. The wood just needed time and stable conditions.
Crowning is permanent. The wood cannot uncrown itself — the damage isn’t just temporary swelling, it’s a structural change in the board’s shape. If you have widespread crowning, refinishing or replacing those boards is the only real path forward. There’s no waiting it out.
Severe cupping — edges curled more than 1/8 inch above center, boards splitting at the seams — usually can’t be saved by drying alone. The wood has been stressed too long. Replacement is the only honest answer at that point.
Call a professional flooring contractor if the damage covers more than 20% of your floor area, if you genuinely cannot locate the moisture source, or if crowning is widespread across multiple rooms. Otherwise, stopping the water intrusion and giving the wood sufficient time is a legitimate DIY fix for mild to moderate cupping.
How to Stop It From Happening Again
Once the immediate problem is handled, keeping it from coming back comes down to one thing — managing humidity consistently.
Target a relative humidity range of 35% to 55% inside your home year-round. A basic digital hygrometer costs around $15 at any hardware store. Put one in your main living area and actually check it monthly. When humidity climbs above 55%, run a dehumidifier. When it drops below 35% in winter, run a humidifier. Wood stays stable in that range — it’s genuinely the cheapest insurance available for hardwood floors.
Seal any crawl space with a vapor barrier. A 6-mil or 10-mil plastic sheet laid over the bare soil, sealed at the edges and around any piers, makes an enormous difference. Pair it with an exhaust vent setup or a dedicated crawl space dehumidifier — something like an AprilAire E100 handles about 100 pints per day and is worth every cent. This single step prevents the majority of cupping problems in homes with crawl spaces.
Never wet-mop hardwood floors. Damp-mop only — cloth wrung out until it’s barely damp. Water finds every seam and crack and soaks straight into the wood underneath. I warped an entire kitchen floor in my first apartment learning this lesson the hard way.
Fix plumbing leaks the same day you find them. The wood does not forgive slow drips.
The math here is simple. Keeping humidity stable costs maybe $150 a year in electricity running a dehumidifier seasonally. Replacing cupped or crowned hardwood floors in an average living room runs $3,000 to $6,000 installed. Do the upfront work.

Leave a Reply