Why Aluminum Wiring Became a Problem in the First Place
Aluminum wiring in older homes has become harder to navigate with all the conflicting advice flying around. Is it safe now? That’s what homeowners ask me constantly — usually right after a home inspection turns up something unexpected. The short answer: not always, but usually manageable.
Here’s the backstory. Between 1965 and 1973, copper prices spiked hard. Supply couldn’t keep up with demand, and builders needed something cheaper fast. Aluminum was lighter, affordable, and sitting right there. Problem solved, right? Not quite.
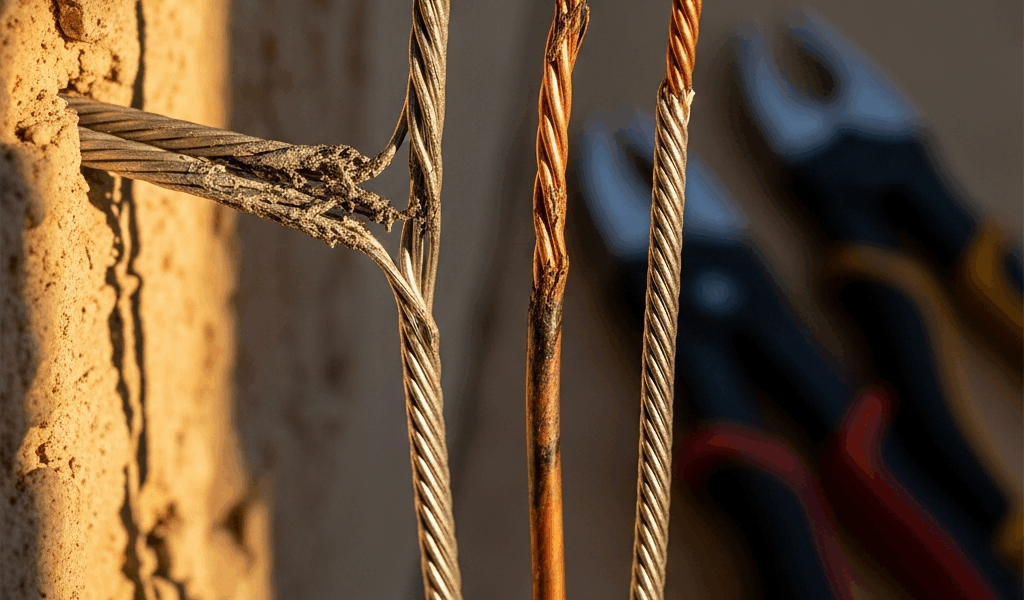
Aluminum and copper behave differently at connection points. Aluminum oxidizes faster — noticeably faster. It also expands and contracts at different rates when current runs through it and heats up. Over years of that thermal cycling, connections work themselves loose. A loose connection creates resistance. Resistance means more heat. More heat means more oxidation. That’s your actual danger zone. Not the wire buried inside your walls, but what happens at the terminals — where wire meets breaker, outlet, or switch.
I learned this firsthand after buying a 1968 ranch house in suburban Ohio and discovering aluminum branch circuits laced through basically every wall. My electrician — a guy named Dave who charged $95 an hour and did not sugarcoat anything — walked me through the whole mechanism while I stood there running worst-case scenarios in my head. Turns out the wire itself isn’t the villain. The exposed connection points are.
How to Tell If Your Home Actually Has Aluminum Wiring
So, without further ado, let’s dive in. First, go look at your electrical panel. Open the cover, or just check the breaker labels without touching anything if that makes you more comfortable. You’re looking for “AL” stamped on breakers or cable jackets — that’s aluminum. “CU” means copper. Some panels also mark it on the main service disconnect.
Second, check whatever wiring you can actually see. Head into the attic or unfinished basement. Aluminum wire looks silver and slightly dull — none of the reddish-brown color copper develops after a few years. If you spot silver wire stapled to joists or running through conduit, note the diameter and write down where you saw it.
Third, pull your permit records. Call the local building department and ask for every electrical permit ever filed for your address. Homes built between 1965 and 1973 are the primary concern, though some builders kept using aluminum wire straight into the late 1970s.
Now — and this matters — finding aluminum wiring does not automatically mean your house is unsafe. That’s the part most online articles skip past too quickly. Thousands of homes with aluminum wiring have run fine for fifty-plus years. The hazard is real. How much it matters depends on condition, installation quality, and exactly which type of aluminum wiring you’re dealing with.
The Real Risk Levels — What to Actually Worry About
Not all aluminum wiring carries equal risk. Let me break this down honestly.
Low Risk — Aluminum Service Entrance Cable
This is the main cable bringing power from the meter into your home. Aluminum service entrance cable is still code-compliant today — still used in new construction, actually. If your aluminum is limited to the service entrance, your concern level is minimal. These connections are fewer in number, physically larger, and far less prone to the oxidation cycling issue that causes problems in branch circuits.
Medium Risk — Aluminum Branch Circuit Wiring at CO/ALR Outlets
Branch circuits are the individual wires running to outlets and switches throughout your home. If those are aluminum and they’re connected to devices marked “CO/ALR” — meaning they’re actually rated for aluminum — you’re in medium-risk territory. The proper device rating helps considerably, but connections can still loosen over decades of thermal cycling. Worth monitoring. Not worth panicking over.
Highest Risk — Single-Strand Aluminum at Unrated Connections
This is where fires actually start. Single-strand aluminum wire connected to standard copper-rated outlets and switches is the worst-case scenario. An outlet that feels warm to the touch, or shows scorch marks around the terminal holes — that’s an immediate red flag. Don’t sit on it.
Also Highest Risk — Improper Previous Repairs
Sometimes a previous owner tried to “fix” the aluminum wiring themselves. Twisted aluminum and copper together, capped it with a standard wire nut, called it done. That creates a galvanic reaction that accelerates corrosion faster than leaving it alone would have. If you spot jury-rigged repairs in junction boxes or outlet boxes, you’re looking at a genuine hazard — possibly worse than untouched original wiring.
The Three Fixes and Which One Makes Sense for You
This is the piece to know up front. Most homeowners don’t need a full rewire. Three legitimate remediation paths exist, and they range from an afternoon project to a two-week construction ordeal.
Fix One — Replace Outlets and Switches with CO/ALR-Rated Devices
Cost: roughly $100–$400 total, depending on how many outlets and switches sit on aluminum circuits. Time: one afternoon if you’re reasonably handy.
This is the partial fix. You swap every standard outlet and switch on aluminum circuits for devices rated to handle aluminum terminations. Leviton makes them — model 5262-W is a common one, runs about $4 each. Pass & Seymour also makes CO/ALR-rated devices at similar prices. The aluminum wire stays in the wall. You’re just ensuring proper termination at the point where it actually matters. It reduces risk, but it doesn’t eliminate it — the connection at the breaker panel is still a potential failure point.
Who can do this: any licensed electrician, or a competent DIYer who’s comfortable working inside an electrical box.
Fix Two — COPALUM or AlumiConn Connectors at Every Connection Point
Cost: $800–$2,500 depending on the number of connection points in the home. Time: roughly 4–8 hours of electrician labor.
This might be the best option, as aluminum wiring remediation requires absolutely solid connections at every termination point. That is because even one loose connection can initiate the heat-oxidation cycle all over again. COPALUM connectors use a specialized solder compound and require a crimping tool that costs around $800 — which is why this isn’t a DIY job. AlumiConn takes a different mechanical approach but achieves the same thing: a stable, corrosion-resistant connection that doesn’t degrade the way bare aluminum-to-copper contact does.
This is what I had done on my 1968 house. Cost me $1,840 total — Dave brought his COPALUM crimping equipment, worked through every junction box and outlet in the place over about six hours, and handed me a written report at the end. My insurance company accepted the documentation. Properly installed, these connectors are expected to last as long as copper wiring itself.
Who should do this: only electricians certified to install COPALUM or AlumiConn. Seriously. Steer clear of where I went wrong of getting quotes from two uncertified guys first — one of them tried to tell me standard wire nuts were fine with anti-oxidant paste. They are not fine.
Fix Three — Full Rewire with Copper
Cost: $8,000–$25,000 depending on home size, wall construction, and local labor rates. Time: several days to two weeks of active work.
This removes the question entirely. New copper branch circuits, new outlets, new switches, new everything. It’s the nuclear option — appropriate when you’re already gutting the home for a renovation, when the existing aluminum wiring is deteriorated beyond practical repair, or when you simply want absolute certainty and you’re willing to pay for it.
I know homeowners who went this route even after completing COPALUM repairs. That’s their call. Just know that full rewire isn’t mandatory in most situations — it’s the maximum possible response, not the required one.
What to Do Before You Call an Electrician
Don’t panic and immediately call an electrician. Get informed first.
Document Everything
Photograph your electrical panel — specifically the breaker markings and any cable labels visible near the main disconnect. Note every location where you’ve spotted aluminum wire: attic, basement, specific rooms, specific walls. Photograph any outlet or switch that feels warm or shows discoloration around the terminal slots. Write down the year the home was built. All of this makes your electrician’s evaluation faster and your estimate more accurate.
Check Your Insurance Policy
Call your homeowner’s insurance carrier and ask directly: “My home has aluminum branch circuit wiring. Are you aware of this, and does it affect my coverage or premium?” Some insurers add a surcharge — usually $100–$300 a year. Some exclude coverage for electrical fires specifically attributed to aluminum wiring. A few won’t insure aluminum-wired homes at all anymore. I’m apparently in a surcharge bracket with my carrier, and State Farm works for me while two other companies I called never would quote the property at all. Better to find out now.
Pull Permit History
Request electrical permit records from your local building department. You want to know whether any previous owner made repairs or modifications to the aluminum wiring. A clean permit history means you’re starting from baseline original wiring. Prior permits might mean upgrades — or they might mean someone did something worse than nothing. Either way, you need to know before an electrician starts billing hourly.
Assess Immediate Red Flags
Walk through the house. Check outlets on aluminum circuits. Warm to the touch? Scorch marks? Any flickering lights, tripped breakers that won’t stay reset, or burning smells near outlets? If yes to any of those, you have an urgent problem — not a routine concern you can schedule for next month. Call an electrician today.
For a typical 1960s home with aluminum branch circuits connected to standard outlets, the practical path looks like this: get a licensed electrician to evaluate the existing connections, then decide between CO/ALR device replacement on the low end or full COPALUM remediation on the higher end. Both are legitimate. The right choice depends on your budget, your risk tolerance, and what the inspection actually turns up.


Leave a Reply