Why a Constantly Running Sump Pump Is a Problem
Sump pump troubleshooting has changed quite a bit thanks to the conflicting advice flying around. As someone who has pulled out close to a hundred sump pump baskets over the past decade, I figured out how to handle why these things won’t stop running. Today, I will share it all with you.
Your pump is supposed to cycle on and off. Water rises in the pit, pump kicks on, water drains, pump shuts off. A normal cycle runs maybe 30 seconds to a few minutes. That’s it. When the pump starts running in tight little intervals — or worse, just never stops — something has broken down. The motor runs hotter than it’s rated for. Your electric bill climbs. And if it burns out completely at 2am, you wake up to a flooded basement. Not great.
But here’s the thing most homeowners don’t realize: you’re probably not looking at a dead pump. You’re looking at a $15 fix someone missed.
Check the Float Switch First
About 70% of the constant-running calls I’ve seen came down to one culprit — a stuck float switch. This is honestly where you start. Everything else comes after.
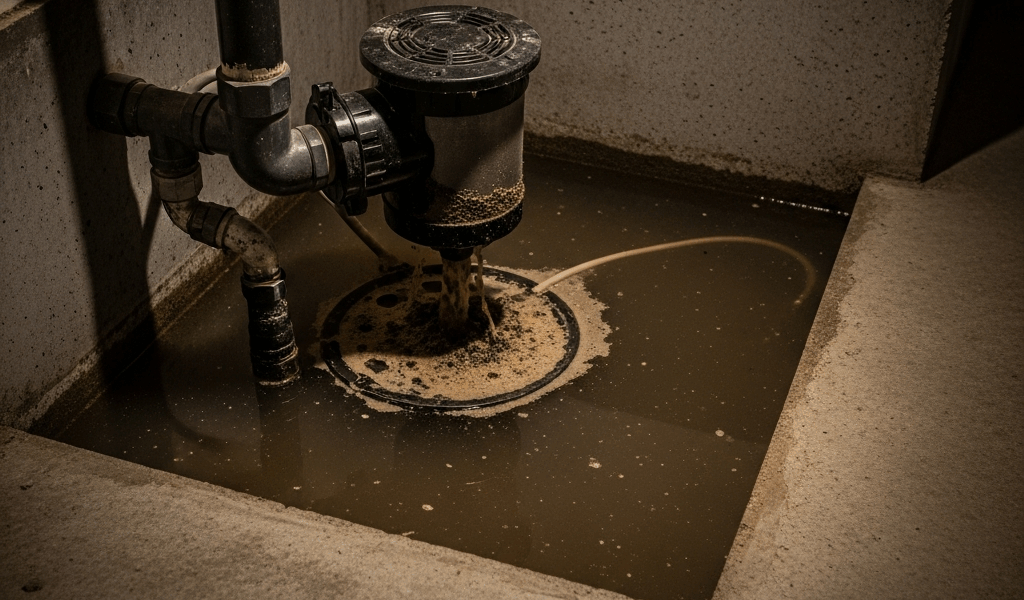
But what is a float switch? In essence, it’s a simple trigger mechanism attached to your pump. But it’s much more than that. Inside your sump pit, a plastic ball or bulbous cylinder connects to an arm on the pump housing. Water rises, float rises, switch triggers, motor turns on. Water drains, float drops, power cuts. Clean cycle — when it works.
When the float gets jammed in the “on” position, the pump just keeps running. The arm gets wedged against the pit wall. Or it tangles in a discharge line hanging too low. Sometimes the float itself cracks, fills with water, sinks to the bottom, and stays in trigger position permanently. That was probably happening in your pit for weeks before you noticed.
DIY Float Check
Pop the sump pit cover off. Find where the float attaches to the pump. Grab it gently and run it through the full range of motion — up, down, side to side. A healthy float moves smoothly. It should feel light on the way up and drop naturally when you release it. Any resistance, any sticking, any arm that refuses to return to resting position? You found your problem.
Next, look at where the discharge line sits relative to that float arm. Most sticking happens because the line dangles back into the pit or rests against the pump housing. The float arm needs at least 3 to 4 inches of clearance on all sides — no exceptions. A few zip ties or PVC clamps holding that line firmly against the pit wall usually solves it immediately.
If the arm won’t move at all, or if you see cracks in the float body, replacement is your only option here. A universal float switch kit runs $20 to $40 at any hardware store. Fifteen minutes of work. Unplug the pump, disconnect the old switch from its terminals — usually two wires screwed in — and wire up the new one. Black to black, red to red. Don’t overthink it.
Check for a Broken or Missing Check Valve
Float moves perfectly and the pump still won’t shut off? Move to the discharge line — the pipe running out through your basement wall or up through the floor.
The check valve lives on this line, usually within 3 feet of the pump connection. Short cylindrical fitting, roughly 2 inches long, with an arrow stamped into the side showing which direction water should travel. Its entire job is one-way traffic. Water goes out. Water does not come back in. When the pump shuts off, whatever water is already in that discharge line should stay there — not drain backward into your pit, refilling it instantly and forcing the pump to restart.
A failed check valve creates a very specific pattern. The pump runs for 10 seconds, shuts off for 5 seconds, restarts. Over and over. Some people describe hearing a glug-glug-glug sound from the discharge line between cycles. That’s water falling back down. That’s your check valve failing to do its job.
Testing and Replacement
Run the pump manually and listen to the discharge line. Then shut it off and listen again. Hear water gurgling backward down the line after the pump stops? Failed valve. Simple as that.
You can also unscrew the valve — have a rag ready, water will drip — and look inside for the internal flapper. It should swing freely in one direction only. Cracked flapper, stuck flapper, missing flapper entirely: replacement is the only answer. No patching a check valve.
Comfortable with basic plumbing? This is a solid DIY repair. Turn off the pump. Two wrenches — one holding the discharge fitting still, one turning the valve off. Wrap the threads of your new valve with plumber’s tape, three wraps clockwise, then thread it in hand-tight and snug it with a wrench. The arrow must point away from the pump, toward the exit. That’s the step people skip. Don’t do what I did.
A quality check valve runs $25 to $60. Worth every cent. And fair warning — if you look at your discharge line and there’s just a bare fitting with no valve at all? Congratulations. Someone forgot to install one originally. Older installations skip this constantly. Add one and your problem is probably solved.
Groundwater Problems vs. Plumbing Leaks
Float moves freely. Check valve is solid. Pump still runs constantly. At this point, your pump might actually be working perfectly — it’s just working hard.
Heavy rain raises the water table. So does spring thaw. So does a broken water line near your foundation, or a crack in a footing drain. If water is entering your pit faster than the pump can discharge it, the pit never empties, the float never drops, and the pump never rests. It’s not broken. It’s overwhelmed.
The Bucket Test
Here’s how you find out what’s actually happening. Stop all water use in the house for 30 minutes. Manually trigger the pump and let it run until the pit is bone dry. Kill the pump. Now watch the clock and wait for the water to refill to float-trigger level. If that takes less than 5 minutes, you’re dealing with serious groundwater intrusion — or an active plumbing leak nearby.
Real groundwater problems aren’t DIY fixes. You’re looking at drainage work, possible foundation grading, or a professional plumber tracking down and sealing an underground leak. But knowing the pump itself isn’t the problem changes everything. You call a plumber. You don’t buy a new pump. That’s what makes this diagnostic step so valuable to homeowners who’d otherwise spend $300 on equipment they didn’t need.
When to Replace the Pump vs. Repair It
Worth saying out loud. Most homeowners assume the motor is dead when it almost never is.
Sump pumps last 7 to 10 years under normal conditions. If yours is pushing past that range and running constantly due to a float or check valve issue, just replace the whole unit. Parts are inexpensive individually — but labor to keep swapping components on an aging pump adds up fast. New pump installation runs $150 to $400 depending on horsepower rating and whether you hire a pro.
Signs the motor itself is actually dying: grinding or squealing during operation, humming without pumping any water, or cycling on and off even after you’ve repositioned the float and confirmed the check valve works. Those are internal motor symptoms. At that point, no repair saves you. I’m apparently a Wayne CDU980E household and that unit has run reliably for going on nine years, while a cheap off-brand unit I tested never lasted past year three. Brands matter on this one.
Here’s your decision tree, simplified. Float stuck or cracked — replace the float switch, $40 DIY or $100 to $150 with a service call. Check valve failed — replace it, $40 DIY or $150 to $200 with a service call. Groundwater or active leak — call a plumber for diagnosis before touching anything else. Pump older than 8 years with recurring component failures — new pump, full stop, no debate.
Before you spend a dollar, spend 20 minutes troubleshooting. So, without further ado — get that pit cover off and start with the float. You’ll probably solve it before lunch.


Leave a Reply